RESEARCH and workshop consideration
Vikings
Vikings, at the British MuseumGhost ship … a reconstruction of Roskilde 6, the biggest Viking vessel ever found, ends the Vikings: Life and Legend exhibition at the British Museum, London. Photograph: Frantzesco Kangaris for the Guardian Frantzesco Kangaris/Guardian
"It cuts through the air like a sword through flesh, relentless. The prow is as sharp as a shark's tooth. A fragile heart of oak survives within the metal skeleton. This ghost ship is solid yet empty, there and not there.
Roskilde 6, the biggest Viking ship ever found, is the lifeblood of the British Museum's exhibition Vikings: Life and Legend. This colossal exhibit – it is 37 metres long in its reconstructed totality, though only about a fifth of the hull is original timber – is spectacular, beautiful, thought-provoking and profound. It embodies not just the nautical ingenuity and martial prowess of the Vikings but their art and beliefs, too.
Around its enigmatic presence are displays that amplify its meanings. A carved, eighth-century "picture stone" from the Swedish isle of Gotland shows such a longship ferrying a dead warrior to Valhalla, the hall of the god Odin, where Vikings who die bravely in battle will feast until they are called to fight in the last battle, Ragnarok.
A phantom Viking ready for that apocalyptic fight glares from a glass case near the warship. He's a surreal composite of metal and bone. His head is a helmet. Under this grins a jaw, with its teeth filed to create a horrific snarl intended to terrify monks. Tattoos would have added to the warrior's scary aspect as he jumped off Roskilde 6 into the surf, screaming and roaring as he rushed onshore to kill and steal and burn."
Ready for the apocalypse … a jawbone, helmet and weapons, at Vikings: Life and Legend, British Museum, London. Photograph: Frantzesco Kangaris for the Guardian Frantzesco Kangaris/Guardian
Carvings of valkyries on display at Vikings: Life and Legend, British Museum, London. Photograph: Frantzesco Kangaris for the Guardian Frantzesco Kangaris/Guardian
This exhibition highlighted the importance of the long ship, however, was limited in terms of exploring arts. Practical developments can be seen however in the carving of materials such as wood, stone and metal. Perhaps in my workshops we can explore carving, helmet design, shields, painting longships etc.
The Stone-age
Textured swirls carved into stone, perhaps exploring the movement of water or feeling of the wind. These carvings could be decorative. But in either case, the technique and process of making could be interpreted as something myself and the class could experiment with. I could provide clay and stone tools through which they might explore texture and movement.
The above images show cave paintings preserved over the centuries, providing insight into the types of materials and approaches used when creating art and dialogue. Raw natural materials such as mud, chalk, clay, leaf stain, berries, blood, and charcoal were used to create images depicting life and animals.
My response to the above images
Exploring rough texture, and materials such as charcoal and mud-ink I created the below image in response to the stone age cave paintings shown above. My intention was to recreate and explore the textured drawing approach, and analyse how children may also create images in the style of stone age people.
I scratched, rubbed smudged, pressed and splattered using twigs, sticks of burnt wood, charcoal and chalk.
This could be turned into a very accessible and successful workshop, as not only is the subject relevant but the process will engage students in the times.
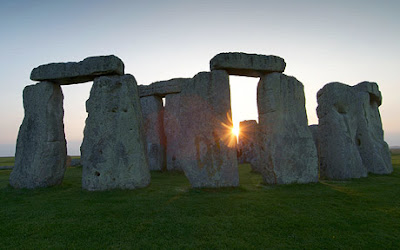
Stone-henge
For many years, archaeologists have wondered why the people who built Stonehenge – a prehistoric monument in the south of England – used huge rocks that came from more than 300 kilometres away. A team of researchers believes the rocks may have been chosen because they produce musical sounds.
Stonehenge was built between 3000 BC and 2000 BC, during the Stone Age or Neolithic era. Archaeologists think it was originally used as a burial ground and temple.
Stonehenge was made with two types of stones: sarsens and bluestones;
Sarsens were the rocks used to build the outer circle, which is made up of pairs of large standing stones with lintels (one rock balanced across the tops of two other rocks). They were found locally.
The older, inner circle includes bluestones. These are believed to have come from a place called Carn Menyn, in the Preseli Hills in southwest Wales, about 300 kilometres away.
Recently, a team of researchers from the Royal College of Art in London went to the Preseli Hills to study the visual and acoustic (sound) properties of the landscape. They found that there were many “ringing rocks” in the area – rocks that make a musical, bell-like sound when struck with a small hammerstone. (A hammerstone is a rounded rock that fits easily into the hand and was used as a tool by early humans.)
They think this may be the reason Stone Age people brought bluestones all the way from Wales when they built Stonehenge.
One of the researchers, Paul Devereux, said that many prehistoric cultures around the world thought that stones that make interesting sounds were very powerful. They believed ringing rocks or caves with echoes were the homes of spirits.
Workshops or classroom activities I could offer, or that would be suitable for primary schools based on my research
Textilesclay workshop; ceramics, historical pots, relief, casting, etc
craft, design workshops
drawing with a range of materials ie light, shadow, charcoal
print workshops, using a range of techniques inclusive; paper stencil/sponge print, fruit stamps
painting, various methods and materials
Photography, using contemporary, traditional and camera-less methods.
Sound exploration
Examples of ways these workshops/techniques could be used in context.
these workshops could be used as part of a lesson plan perhaps using a similar breakdown in timekeeping.
10 minute talk, explanation
5/10 minute example
30 minutes activity/craft - broken down accordingly
10/15 minutes to discuss our findings, what we have enjoyed, not enjoyed, share, display.
Based on the knowledge that Russells hall primary school is currently integrating artistic approaches throughout its curriculum, in order to enrich the learning experience, art lessons are being based around the same topics being covered in other classes, ie: Vikings - KS1 and the Stone age.
Below are some examples of how my skills could be applied in these subject areas.
Viking Homestead
Fabric/Textiles
children can make their own weaves/fabrics which vikings would use as blankets in the home.or perhaps children can as a group make one large piece?
I can pre prepare a set number of weaving "boards" from card and wool/string, children can select their own pieces of fabric or twine to create woven pieces to take home or display as part of a wider project.
Making our own Viking metals/Jewellery
Create replica bronze/gold castings of medallions and coins/brooches etc from card, clay.
Use circular cutting tool/cookie cutters to achieve a small circle for decorating, can use the typical glitter glues, gold paint, sequins to enhance metal appearence and precious quality.
Viking Long-ship
Make/draw our own bow heads?
paint their own images of ships at sea?
make our own boats? - premade templates, to be cut out, positioned and glued into 3d models for display? therefore creating our own fleet.
Geographical
Map exercise
Have big map blown up on the white board. Ask class where they think the Vikings came from (hands up) then point out the Scandinavian countries – ask them to colour them in on their a4 handout "Viking world maps"
Next ask where the class think the Vikings travelled to and how they got there... Discuss, mentioning and pointing out different countries, i.e. Iceland.
Then explain that they went everywhere on the map in front of them – even as far as America thanks to the successful design and speed of the Viking long ship.
Viking Warrior
MedallionsClay medallions with their names or messages imprinted in runes, and painted them ready to thread onto leather thongs
Viking weapons/armour
Children can make their own helmets:Cut a strip of card and make a band that will fit around your head. Staple it in place. create an arch by stapling two additional bands across the head. Staple in place, Attach horns, wrap in foil.
Alternatively I can come in with templates pre made for children, that they can colour in, and decorate using various paints and materials, which we can then stick together, or I can take home and bring back in completed etc. unless using quick drying/dry materials in which case I can do this during.
Circular shields in accordance with Viking approaches. Decorate cardboard discs with glue/paint/pencils etc to coincide with a "viking bootcamp" as suggested in lesson plans researched?
Each class or child could have his or her own identifying colour scheme? house teams etc. as war party.
Stone age - KS2
When discussing locally available stone use and tools/clay/organic matter
Fashioning their own tools
If children are permitted outside and also weather according, a short forage for appropriate tools such as twigs, stones, pebbles, pine cones and acorns. ( i can supply these objects and place outdoors if required so as to ensure safety and the appropriateness of item, or simply bring into the classroom and give children one each, or several per table etc)I would suggest then encouraging children to create marks and explore the potential of their "tools" in clay.
Pottery
Using clay give an example of how we might create a bowl and spoon, jar or pot etc. children can then make their own and decorate using their found toolsAdornment
Create beads from clay and found organic materials such as leaves, pieces of wood, stone etc Use twigs or pieces of "bone" to create holes.
(I can provide materials, with pre drilled holes in the harder items such as wood)
thread natural string through holes to create head-dresses/necklaces etc. (leave to dry on a "tree" or bed of leaves. Decorate when dry if required
Cave painting
Using sand, glue and paper or Pre-made sand coated sheets to create cave "walls" for the children to paint on with an appropriate texture.alternatively use of crinkled/worn brown sugar paper or heavy GSM paper.
Children can select from a range of paint created using "soil, sand, stone, dung" etc (pre made tonal colours to suit the origin with organic, classroom friendly paint)
Children can make their own "paints" using pestle and mortar to squash and crush charcoal or sand etc with PVA or water. Alternatively, watery clay and some food colouring etc.
Cave art display, length of plain wallpaper roll, or other paper roll around the room, child has their own space, and we can make a classroom border or display/ background in-front of which to display jewellery and tools etc.
Children can simply paint onto clay slabs with class-made paints. food dye and wet clays.
Children can create their own small caves:
Bring in a cardboard box from home, we can glue and put sand on them and paper balls to create a cave surface on which to paint or draw.
During the stone age, drawings were also created by spitting/blowing pigment down a tube of reed or other plantation or horn over the hand or other object, creating an image in negative.
Children can use water spray bottles to spray over leaves, twigs and their hands.
Other craft Ideas
clay reliefs:use found items in a mark making, pressing manner.
create stamp tools with card, glue and found objects or string. whe dry these can be used as a stamping tool in clay.
Weaving, spindle whorls, fabric, flint and striker, pots, spoons, game board, horns wall paper paintings, armour, metal fabrication if going on to discuss the copper age and smelting.
Other creative learning Ideas
If working with a range of subjects:
Mystery box - artefacts - children guess objects based on facts in subject ie; roman coins, geography stones/materials, maths - basic shapes and touch,
science/water/compounds/liquids etc (planet x) wax and water, light and shadow
role play - literacy, playing out books, plays and presentations/drama
displays
maths and trigonometry? basic shapes and repetition
history - mosaics/murals
materials - history/stone age - clay, tools, natural found materials, paint making, cave painting
poetry and illustration - literacy - dependent upon topic eg, material representative of topic (watercolour/fluidity/poetry)
symmetry and mirrors, action and drama - maths and symmetry
If offering purely Art skills based
skills
self portraiture
portraiture - children sat opposite and told to choose materials
workshops based on subjects being taught in the school - see above
For any of the above would need:
natural water based materials
safe tools
aprons
organic dies/colours/paints
Example of how skills or approaches I can offer, have previously and successfully applied in primary school.
These examples have been directly taken from "Teaching art" by Nigel Meager''
Below; a series of drawing approaches and methods for children drawing portraits. Something that I may need to utilise in the school when creating Tudor miniature portraits.
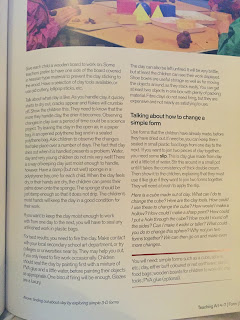
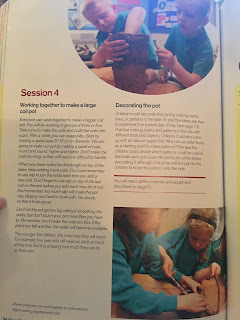
Where I would usually use a wheel or in fact mould from a ball, using clay, children are best encouraged to use a coiling approach. It is simple to grasp and easy to do, often resulting in better symmetry and sturdiness than if asked to mould from a ball or lump.
Research - Existing examples, lesson/workshop ideas, tried and tested approaches.
Example of how skills or approaches I can offer, have previously and successfully applied in primary school.
These examples have been directly taken from "Teaching art" by Nigel Meager''
Below; a series of drawing approaches and methods for children drawing portraits. Something that I may need to utilise in the school when creating Tudor miniature portraits.
"start by drawing the eyes"
This allows children to balance the image based on the main focus point, work up line and tone in stages
Where I would usually use a wheel or in fact mould from a ball, using clay, children are best encouraged to use a coiling approach. It is simple to grasp and easy to do, often resulting in better symmetry and sturdiness than if asked to mould from a ball or lump.


No comments:
Post a Comment